PhotobucketPhotobucketPhotobucketPhotobucketPhotobucketPhotobucket

Sunday, June 30, 2013

Chalkboard Labels~Made to Order

post by katie
Need to get organized?  I have a solution, we have chalkboard labels at the Cottage, they are a fun, stylish way to organize your home.  They can be made to order in any size or quantity.

My friend used them after redoing her kitchen in this post...aren't they so cute...she's super organized.


We also have a huge supply of antique ball jars right now, and milk jars with labels already on them.  They look super cute in the kitchen cupboards and pantry.


there is no lack of inspiration out there where antique mason jars are concerned.  I think they are the "it" decor item of the moment.  From use as a vase at a wedding,  fashioned into an industrial looking lighting fixture, to organizing your pantry.  They are simple, and sooo adorable.  

Here's a bit inspiration, using chalkboard labels that I chose from Pinterest...


more toys


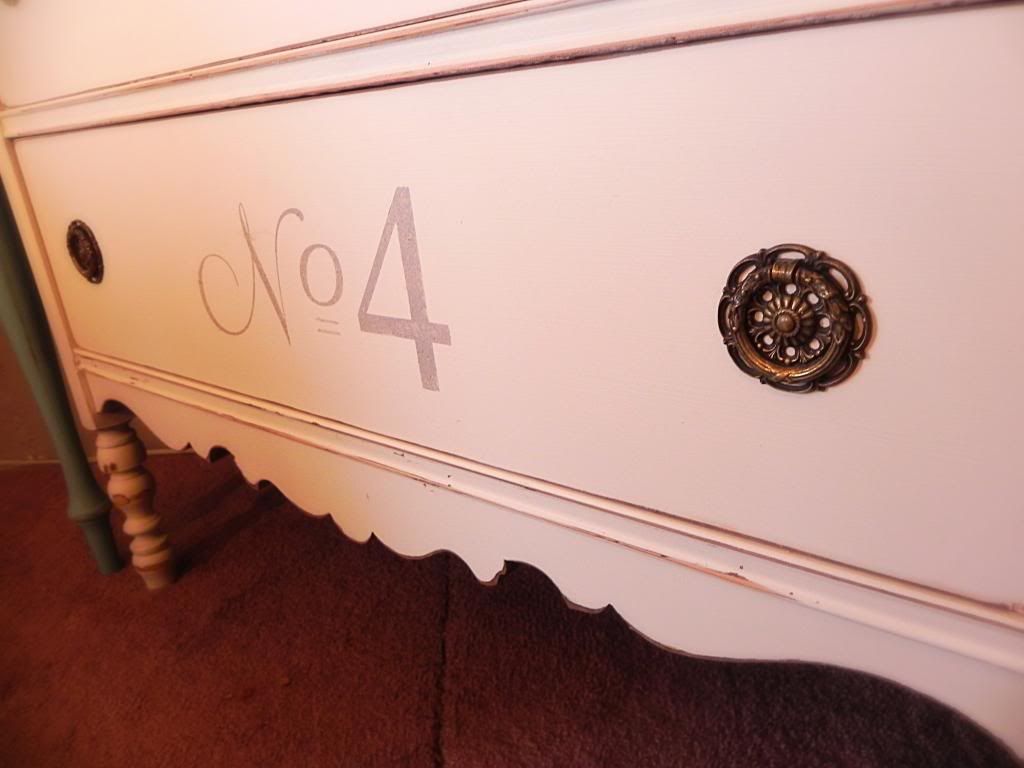
I can make up to approx. 12" x 18" labels like this one...

Each label made with high quality vinyl, and are super easy to use just peel, place, and stick.  Shoot us an email if you'd like to special order chalkboard labels, or visit the cottage I have sheets of them or little sets of three in standard sizes.  (we don't normally ship, but I'm pretty sure if if your not local we can figure out how to get them to you:).

Thanks so much for takin' your precious time to stop by.

                                                                                                        Katie

Linking Too:

Thursday, June 20, 2013

Dainty Dresser

Post by Katie

I found this pretty little dresser at an estate sales.  It was one of those rare awesome estate sales with really cool stuff AND reasonable prices.

Well it didn't start out so pretty, it had a really bad paint job, huge yellow drips down the back and all.  The handles were all turned wrong because they were missing the tiny nail at the bottom, but they were all there(I almost always forget to take the before pic until I had already started).  The drawers worked, nothing broken, and the price was right.  

So I got to work, as always, sand, prime, clean, two coats of paint, distress, clean, add a little character, and put those lovely handles back on.

I decided to do stenciled numbers again.  Yeah it's been done, but it's a way to add a little character, and I just really like it.

I painted it in our Cottage White, and Paris Gray for the stenciling.  I think it's so pretty and feminine with it's legs showing and curvy little skirt.  I left the original handles untouched.

Here she is before...


Here she is all dressed up at the Cottage...


Thanks so much for stoppin'

                                                                                Katie

We're Sharing on these Links ~~
Miss Mustard Seed

Feathered Nest Friday ~ French Country Cottage

No Minimalist Here ~ Open House Party

From My Front Porch To Yours ~ Treasure Hunt Thursdays

The Shabby Nest

Home Stories A to Z

Dwellings ~ Amaze Me Mondays


Sunday, June 16, 2013

My Summer Front Porch

post by Katie


By adding a "welcome" a new boxwood wreath, some shiny lanterns, house number on a plaque from my stash, and few other touches I created a pretty porch perfect for first impressions.

(yeah that's me in reflection, I'm working on my picture taking skills)

Here it is a month or so ago...Yawn


I also took away the little door mat(everyone has those) and added a big bold rug instead($30 at Target, not 
much more than a little 'ol door mat).  

Before...
A new rug is the perfect(and easiest) place to start.  I had my color palette pretty much sticking to mostly green, white and black.

After...

I'm really loving boxwood's right now.  I've actually been looking for an everyday wreath for my front door for awhile, of course Target had the perfect one.  I also added the "Welcome" I made on the Cricut.


My mom actually gave this little plaque to do some Cricut on and sell, (maybe she won't notice).


The lanterns all actually come from different places.  I got the first one from a garage sale(score, right).  I got another one at Goodwill, and the third one was on clearance at TJ Maxx because it was missing a pane of glass, but I don't think you could ever notice.  I just love em.


I made the chalkboard from a window I broke, just cut a thin board to size and painted with chalkboard paint.


I added some pillows to my Adirondack chairs, also from Target, and moved my little 'ol door mat over here.


It wouldn't be a summer porch without all the potted plants, I stuck to mostly greenery, and white flowers.


So there ya go, I hope it's a tiny bit of inspiration, I know there's a lot out there, but that's my interpretation of the perfect summer porch(well within a budget anyway).

Porch dreams for the future... new light fixture, and family established sign on an old window, possibly painting the bistro black(what do you think I need opinions on that one).

Oh and Happy Father's Day!  We're off to go fishing.
Thanks for stoppin'

                                                                  Katie

Wednesday, June 12, 2013

Rustic Little Boy Dresser


Post by Katie
This little dresser was my sons little boy dresser, he's fourteen now, so it was time to do a little updating.  we played a little musical rooms recently, the little girls needed the big room because they are sharing, and boys don't really need a big room anyway so we swapped, and updated a little in the process.

I actually did away with a dresser altogether, and just got organizers for the closet from Ikea.  So it was time to get rid of the dresser, weird but it made me a little sad when I went to repaint it.  The paint job was in pretty bad shape, and you can see where he carved his name in it, funny how kids do that they can't even blame it on someone else.  I'm sure I wasn't happy about it at the time, but now it just makes me sad.
It seems almost every project has a lesson, on this one it was "always prime".  I thought since I was just painting over red with red, I would skip the priming, I wasn't just being lazy, it's been awhile since I've painted anything red, and I guess I forgot there is red spray primer, and I didn't want white primer showing through when I distressed.  I painted and it looked awful so I had to prime and then paint again.

I actually wanted to add little stained wooden numbers, but I couldn't find any and I kinda wanted to just finish it.  I settled for making number stencils on the Cricut, and painting them on, except when I removed the vinyl a lot of paint came off with it.  My solution was to just really distress the rest of the dresser, and I think it turned out really rustic, and cute especially with the added wood back splash, made from a pallet, and those adorable little bird handles.


Here it is before...

And here it is all finished and at the Cottage...

Thanks for Stoppin'
                                                                           
                                                                                  Katie

Saturday, June 8, 2013

Cottage Revamp Part IIII

This will be my final installment of our little makeover at the Cottage.

This is our Summer Room filled with Gardening Bliss...


How much do you love that Potting Bench...


We also have this one...


Just in case you need some gardening inspiration, my mom has been hard at work all over the Cottage


I hope you enjoyed seeing almost everything we have to offer right now, although honestly that wasn't even everything.  If your into pink, or our butterscotch color, you'll just have to come and see us, or maybe I'll save that for yet another post.

Thanks so much for spending your precious time with us. 

                            
                                                          Katie

Shared With~